Summarize in:
TL;DR
A strong course outline makes your course easier to build, follow, and sell. Start with a clear transformation, break it into structured modules, and keep lessons short and actionable. Use templates or AI to speed things up, then choose the right tools to design, deliver, and promote your course.
Building a course without an outline usually sounds fine at the start. You have the idea, you know what you want to teach, and it feels like you can figure out the structure as you go.
But, that’s actually where things start to slip.
Lessons get longer than they need to be, topics overlap, and the overall journey becomes harder to follow, both for you and for your students. When the course structure isn’t clear, the value of what you’re teaching becomes harder to communicate.
A solid course outline solves that early.
In this guide, you’ll find three ready-to-use course outline templates, along with a simple process for turning them into a finished course, tools to help along the way, and AI prompts to help you create a killer course outline in minutes.
Key takeaways
- A clear course outline helps you structure your content, stay focused, and communicate the value of your course more effectively
- High-converting outlines are built around a clear transformation, logical modules, and focused lessons
- Short, actionable lessons with built-in tasks lead to better engagement and completion rates
- You can speed up the process by using ready-made templates or generating a draft with AI
- The outline is just the starting point, execution and clarity are what make a course successful
The anatomy of a high-converting course outline
A good course outline shapes how your course is experienced, understood, and ultimately bought.
Strong outlines tend to follow the same core structure:
1. A clear transformation
Every course needs a defined “before and after.”
- Before: What your student is struggling with now
- After: What they can do, achieve, or understand by the end
If this isn’t obvious, the course will feel vague, no matter how good the content is.
2. Logical modules (milestones)
Modules should represent meaningful stages in the journey, not just grouped topics.
Think in terms of progress:
- Foundation → application → refinement
- Or beginner → intermediate → advanced
Each module should move the student closer to the final result.
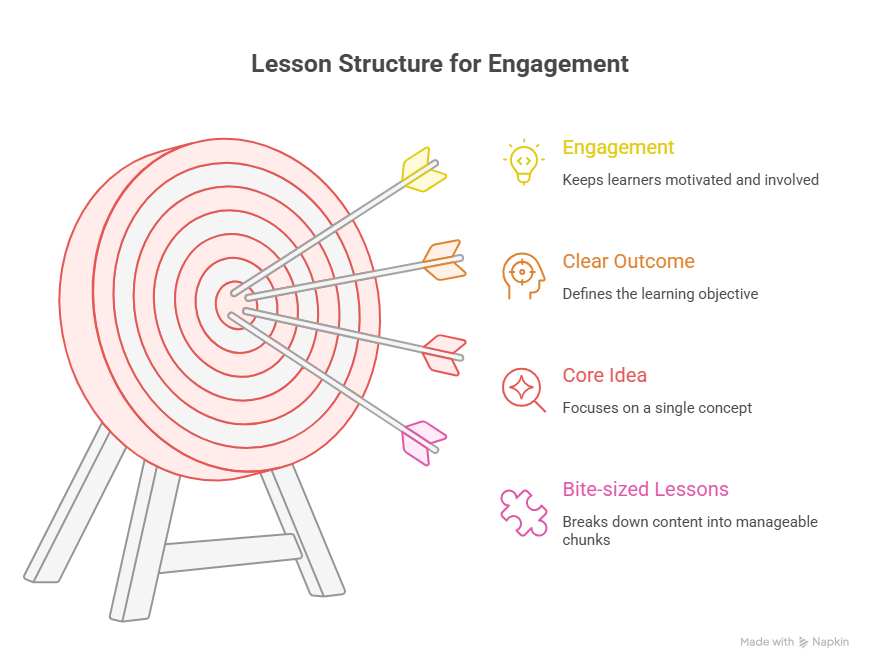
3. Focused, bite-sized lessons
Within each module, lessons should stay tight and specific.
- One core idea per lesson
- Clear outcome by the end
- No unnecessary tangents
This keeps engagement high and makes the course easier to complete.
4. Built-in action steps
Courses that convert well don’t rely on passive learning.
Each module (or lesson) should include:
- A task
- A worksheet
- A quick implementation step
Students can see results early, which increases satisfaction and completion rates.
5. A clear progression path
Students should always know where they are and what comes next.
That means:
- A natural flow between modules
- No repetition or backtracking
- A sense of momentum throughout the course
When the path feels obvious, people are far more likely to stick with it.
3 free copy-paste course outline templates
If you don’t want to build your course outline from scratch, start here.
Below are three ready-to-use templates you can copy directly into Google Docs and customize for your course.
Template 1: The “mini-course” lead magnet
Use this for short, focused courses designed to solve one specific problem quickly. Ideal for lead generation or tripwire offers.
Course Title: [Clear, outcome-driven title]
Target Audience: [Who this is for]
Desired Outcome: [What they will achieve by the end]
Module 1: Introduction
- Lesson 1.1: The problem and why it matters
- Lesson 1.2: Common mistakes to avoid
- Lesson 1.3: Your first small win
Action Step: [Simple task to build momentum]
Module 2: Core Concept
- Lesson 2.1: Key framework or method
- Lesson 2.2: Step-by-step walkthrough
- Lesson 2.3: Real example or case
Action Step: [Apply the concept]
Module 3: Implementation
- Lesson 3.1: Putting it all together
- Lesson 3.2: Troubleshooting common issues
- Lesson 3.3: Optimising results
Action Step: [Complete implementation task]
Next Steps: [Where to go after this course]
Template 2: The comprehensive “signature” course
Use this for a full, premium course that takes students through a complete transformation.
Course Title: [Clear, outcome-driven title]
Target Audience: [Who this is for]
Core Transformation: [Before → After]
Module 1: Onboarding & Foundations
- Orientation and expectations
- Tools and setup
- Key principles
Module 2: Fundamentals
- Lesson 2.1: Core concept
- Lesson 2.2: Essential skills
- Lesson 2.3: First implementation
Module 3: Phase 1 (Building Momentum)
- Lesson 3.1: Step-by-step execution
- Lesson 3.2: Common pitfalls
- Lesson 3.3: Practical application
Module 4: Phase 2 (Scaling Results)
- Lesson 4.1: Advanced techniques
- Lesson 4.2: Optimisation strategies
- Lesson 4.3: Case studies
Module 5: Phase 3 (Mastery)
- Lesson 5.1: Refinement
- Lesson 5.2: Troubleshooting
- Lesson 5.3: Long-term strategy
Module 6: Graduation & Next Steps
- Final project or assessment
- Review and consolidation
- Next-level opportunities
Template 3: The corporate training workshop
Use this for internal training, team onboarding, or skill development programs tied to business outcomes.
Workshop Title: [Clear, business-focused title]
Audience: [Team, department, or role]
Business Objective: [What the company wants to improve]
Success Metrics (KPIs): [How success will be measured]
Module 1: Context & Objectives
- Why this training matters
- Current challenges
- Desired outcomes
Module 2: Core Skills Training
- Lesson 2.1: Key concept
- Lesson 2.2: Demonstration
- Lesson 2.3: Guided practice
Module 3: Team Application
- Group exercise or workshop
- Scenario-based training
- Feedback session
Module 4: Implementation Plan
- Individual action plans
- Team alignment
- Timeline for rollout
Module 5: Assessment & Retention
- Knowledge check or quiz
- Practical evaluation
- Follow-up plan
Tip: Every online course needs a great description to draw in new students. Check out our guide to writing course descriptions to learn more.
How to fill out your course template
Once you have a template, the next step is turning it into a clear, structured course.
You don’t need to overcomplicate this. A simple process will get you from idea to outline quickly.
Step 1: Define the “before and after”
Start with the transformation.
What is your student struggling with right now, and what should they be able to do by the end?
Be specific.
- Before: Vague understanding, inconsistent results, or frustration
- After: A clear skill, outcome, or measurable improvement
Example: A beginner email marketer might start with low open rates and no clear strategy. By the end, they can write, structure, and send campaigns that consistently get engagement.
This transformation becomes the foundation for everything else.
Step 2: Brainstorm the big milestones (modules)
Next, break the transformation into major stages.
Most courses naturally fall into 3 to 5 phases:
- Understanding the basics
- Applying the core method
- Improving and optimising results
Each module should represent a meaningful step forward.
Example: For a beginner fitness course, modules might look something like this:
- Module 1: Building a simple workout routine
- Module 2: Learning proper form and technique
- Module 3: Staying consistent and tracking progress
If a module doesn’t move the student forward, it probably doesn’t need to be there.
Step 3: Slice milestones into bite-sized lessons
Now, turn each module into individual lessons.
Keep lessons focused and easy to consume:
- One concept per lesson
- Clear outcome by the end
- Ideally under 10 minutes if video-based
This makes your course easier to plan, follow, and complete.
Example: Module 2 could become:
- Lesson 2.1: Learning proper form for key exercises
- Lesson 2.2: Avoiding common mistakes and injuries
- Lesson 2.3: Building a balanced full-body routine
Short, focused lessons decrease any sense of overwhelm and keep momentum going.
Step 4: Add actionable homework
Passive content doesn’t drive results.
Each lesson should give the student something to do:
- Write something
- Test something
- Apply what they just learned
This is where real progress happens.
Example: After a lesson on building your workout plan, homework could be to create a month-long plan targeting key areas and including rest days.
Repeat these steps as needed until your course is fully fleshed out and easy to follow.
Tip: With such a great outline in the works, the next step is asking for the right price. Check out our guide to pricing your online course to learn more and get the most signups.
Using AI to generate your first draft (bonus prompts)
If you want to speed things up, AI can help you generate a solid first draft of your course outline in seconds.
The key is giving it the right level of detail.
Here’s a prompt you can copy and customize:
Prompt
Act as an expert instructional designer. Create a course outline for a [target audience] who wants to achieve [specific result].
Break the course into 5 modules, each with 3 actionable lessons.
For each lesson, include:
- a clear lesson title
- a short description of what will be covered
- one practical exercise or action step
Keep the structure clear, logical, and focused on helping the student achieve a measurable outcome.
You can refine the output by adding constraints, such as:
- limiting lesson length
- focusing on beginners or advanced learners
- including real-world examples or case studies
Tip: If you want a faster, more guided approach, use the free Deadline Funnel Course Outline Generator to generate a structured outline tailored to your course idea without needing to write prompts manually.
The best software for visual templates, creation, and organization
Once your outline is structured, the next step is turning it into something usable, presentable, and easy to deliver.
Different tools serve different roles:
- Planning and structuring
- Designing materials
- Delivering and selling courses
Here are the best options depending on what you need.
Canva
Canva is one of the fastest ways to turn a rough outline into something polished and visually appealing. It’s built for non-designers, which makes it ideal if you want professional-looking materials without spending hours learning design tools.
You can use Canva to create:
- Course PDFs and workbooks
- Slide decks for lessons
- Lead magnets and downloadable resources
It comes with thousands of templates, so most of the work is adapting rather than designing from scratch.
Pricing: Free plan available. Paid plans typically range from ~$10-15/month.
| Pros | Cons |
| Easy to use with no design skills needed | Limited flexibility for complex layout systems |
| Huge library of templates | Can feel restrictive for advanced users |
| Fast export for PDFs and presentations | Not built for structuring course content |
Notion
Notion is a flexible workspace that works well for structuring and managing your course before it becomes a finished product. It’s not about design, it’s about clarity and organisation.
You can:
- Build a full course structure with nested modules and lessons
- Store scripts, notes, and resources in one place
- Share your outline with collaborators or even students
Some creators even use Notion as a lightweight course hub, especially for early-stage products.
Pricing: Free plan available. Paid plans typically range from ~$8-15/month.
| Pros | Cons |
| Extremely flexible structure | Can become messy without clear organisation |
| Great for planning and collaboration | Not visually polished out of the box |
| Can double as a course hub | Requires setup time |
Google Docs
Google Docs is still one of the most practical tools for actually building your outline. It keeps things simple, which is exactly what you want at this stage.
You can:
- Write and restructure quickly
- Collaborate in real time
- Leave comments and iterate easily
Most creators start here before moving into design or delivery tools.
Pricing: Free.
| Pros | Cons |
| Fast and simple to use | No visual presentation features |
| Excellent for collaboration | Limited formatting options |
| Easy to restructure content | Not suitable for final course materials |
Microsoft PowerPoint
PowerPoint is a great resource if your course is presentation-driven or includes recorded lessons. It helps you translate your outline into something you can teach from directly.
You can:
- Turn modules into structured slide decks
- Build visual explanations for complex ideas
- Use slides for live or recorded sessions
It’s often used for corporate training or workshop-style courses.
Pricing: Included in Microsoft 365 (~$7-12/month).
| Pros | Cons |
| Strong for teaching and presentations | Not designed for course planning |
| Widely used and familiar | Limited content management features |
| Works well for video lessons | Can become slide-heavy |
Miro
Miro is a visual thinking tool that helps you map out your course before locking it into a rigid structure. It’s especially useful when your ideas feel scattered.
You can:
- Map the full student journey
- Group and reorganise modules visually
- Brainstorm ideas without constraints
It’s not a final output tool, but it’s excellent for early-stage clarity.
Pricing: Free plan available. Paid plans typically range from ~$8-16/month.
| Pros | Cons |
| Great for brainstorming and mapping | Not suitable for final course delivery |
| Visual and flexible | Can get chaotic with large projects |
| Strong collaboration features | Requires cleanup before use elsewhere |
Figma
Figma is a professional design tool that gives you full control over how your course materials look. It’s more powerful than Canva, but also requires more effort.
You can:
- Design custom workbooks and slides
- Create reusable layout systems
- Collaborate with designers or team members
If presentation quality matters a lot, this is a strong option.
Pricing: Free plan available. Paid plans typically range from ~$12-15/month.
| Pros | Cons |
| Highly customisable designs | Steeper learning curve |
| Professional output quality | Slower for beginners |
| Great for team collaboration | Overkill for simple needs |
Trello
Trello helps you turn your course into a set of manageable tasks. It’s less about content and more about execution.
You can:
- Break modules into actionable steps
- Track progress visually
- Stay organised while building
It’s a great fit if you struggle with follow-through.
Pricing: Free plan available. Paid plans typically range from ~$5-10/month.
| Pros | Cons |
| Simple and visual workflow | Limited depth for complex projects |
| Easy to use | Not built for content creation |
| Great for solo creators | Can become cluttered |
Asana
Asana is a more structured project management tool designed for larger builds or teams. It gives you more control over timelines and dependencies.
You can:
- Assign tasks across a team
- Track deadlines and dependencies
- Manage complex course builds
It’s useful if your course production is more involved.
Pricing: Free plan available. Paid plans typically range from ~$10-25/month.
| Pros | Cons |
| Powerful project management | Can feel overwhelming |
| Great for teams | Not ideal for simple projects |
| Strong timeline features | Requires setup |
Gumroad
Gumroad is a lightweight platform for selling digital products, including simple courses. It focuses on getting you live quickly.
You can:
- Upload course content
- Create a checkout page
- Start selling with minimal setup
It’s ideal if you don’t need complex course features.
Pricing: Free to start. Takes ~5-10% per sale.
| Pros | Cons |
| Very easy to start selling | Limited course features |
| No monthly fee required | Less control over experience |
| Simple setup | Not ideal for scaling |
Teachable
Teachable is a dedicated course platform that gives you structure and control over how your course is delivered.
You can:
- Build structured courses with modules and lessons
- Manage students and payments
- Track progress and engagement
It’s a solid middle ground between simplicity and functionality.
Pricing: Typically ~$29-99/month.
| Pros | Cons |
| Built specifically for courses | Monthly cost |
| Structured learning experience | Less flexible than custom setups |
| Integrated payments | Platform limitations |
Kajabi
Kajabi combines course hosting with marketing tools, making it a full business platform rather than just a course tool.
You can:
- host your course
- build landing pages and funnels
- run email campaigns
It’s powerful, but you’re paying for an all-in-one system.
Pricing: Typically starts around ~$119+/month.
| Pros | Cons |
| All-in-one platform | Expensive |
| Strong marketing features | Can be overkill |
| Scales with business growth | Less modular |
Deadline Funnel
Deadline Funnel focuses on increasing conversions rather than building or hosting your course. It adds real, personalised deadlines to your offers, which helps turn interest into action.
You can use it to:
- Add countdown timers to landing pages and emails
- Run evergreen course launches with real deadlines
- Automatically close or redirect offers when time runs out
- Sync deadlines across email, pages, and checkout
This is a really handy tool for course creators running funnels, webinars, or limited-time promotions.
Pricing: Starts around ~$39/month.
| Pros | Cons |
| Creates real urgency that increases conversions | Not a course builder or hosting tool |
| Works with most platforms and email tools | Requires setup and integration |
| Supports evergreen and automated funnels | No free plan (14 day free trial) |
If you’re running course launches or funnels, you can start a free trial and test how real deadlines impact your conversions.
Comparison table
| Tool | Primary use | Best for | Starting price |
| Canva | Design | Visual materials and PDFs | Free / ~$10–15 |
| Notion | Structuring | Course planning and organisation | Free / ~$8–15 |
| Google Docs | Writing | Drafting outlines | Free |
| PowerPoint | Presentation | Teaching and slides | ~$7–12 |
| Miro | Mapping | Brainstorming and structure planning | Free / ~$8–16 |
| Figma | Design | Custom layouts and materials | Free / ~$12–15 |
| Trello | Task management | Organising course creation | Free / ~$5–10 |
| Asana | Project management | Team workflows | Free / ~$10–25 |
| Gumroad | Selling | Simple course delivery | Free + fees |
| Teachable | Hosting | Structured course platforms | ~$29–99 |
| Kajabi | All-in-one | Courses + marketing | ~$119+ |
| Deadline Funnel | Conversion | Increasing course sales | ~$49+ |
Tip: Looking for more? Take a look at our guide to the top 15 online course platforms for more great software tips.
Your outline is just the beginning
A strong course outline gives you clarity, direction, and a clear path to follow. It helps you organise your ideas, structure your content, and communicate the value of your course more effectively.
But it’s only the starting point.
What matters next is execution:
- turning lessons into clear, focused content
- building a learning experience people can actually follow
- and making sure your course leads to a real result
That’s what separates courses that sit unfinished from ones that get completed, shared, and recommended.
As you build, keep things simple. Stay focused on the transformation you’re offering, and make each step easy for your students to follow.
And when you’re ready to launch, think beyond the content itself. How you present your offer, create urgency, and guide people to take action plays a big role in whether your course succeeds.